
This month I started another design from Chatelaine Designs: The Dragonfly Boudoir Casket. It's one of the designs from the so called Designing Ladies. Judy Odell designed and charted the box, and several designers came up with a design for that box. Next to subscribing to the yahoo group from Chatelaine Designs, I also purchased the finishing instructions from Judy Odell.
And I'm impressed about the quality of these instructions. Very detailed. I love it. Judy Odell just published a booklet for several different finishes, and I'm planning to buy this one too. My finishing skills will probably get a good boost from that. And I can surely use that...lol Did you know that Judy Odell is the person who originally invented the flat fold. These days it's a common finishing used by lots of people, and it seems forgotten that Judy invented it couple of years ago.
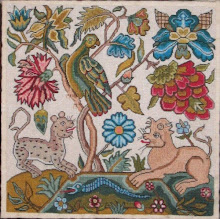
Anyway, here are couple of pictures of my upcoming Dragonfly Boudoir Box. I'm at the moment busy with the 4 sides. Beads and crystals will be added when all stitching is finished.

One of the small sides

Second long side

I did change the letters a bit here, the original ones were harder to identify as G and L. I hope with these changes it's a bit easier
Here you can see all 4 sides together. Above there are 4 beads attached. I did that to see how the color changes when I use black Nymo instead of white to attach them. And I have to admit that the color of the beads doesn't improve with black Nymo. I'll do it or with white Nymo or invisible thread (which I deeply dislike...lol)

What else on the stitching front:
My floss tag for another exchange got sent off....and can you imagine, I completely forgot to take a picture. Dohh!!! I really hope that the recipient will provide me with a picture of front and back.
And I stitched and finished a Christmas ornament for another exchange. This will get send off to it's new home begin next month. No picture until it arrives there.
Ohhh....and Michael and I took the opportunity for couple of long hikes. At the moment we're visiting the old Gold Mines here around. And we're totally in awe how these people got the heavy equipment to the mines. You have to climb and hike, and even our dogs are broken afterwards, and only thing we had to carry were backpacks. Can you imagine getting heavy machinery there? Carrying around stones? Steep hills up and down? It's amazing.
Here you can see Mike taking a picture of an oven. This oven was used to create steam for the stamper in order to crush the stones. They then added some chemicals to it which would bind the gold.

And here you can see what the experts think of having a day of hiking


7 comments:
This looks beautiful Gaby. Can't wait to see it all finished. The colours are wonderful.
This casket is beautiful, Gabi. I know what you mean about the invisible thread. Doesn't show, but it is such a pain to work with. I won the 2007 Designing Ladies needle caskets charts at a retreat, so I'm interested in hearing how yours comes along. Makes me want to pick up mine and start!
What a gorgeous start! Your dogs are adorable :-)
That box looks gorgeous, Gabi!
Beautiful work, Gabi - the box is going to be gorgeous! I'm another fan of Judy's clear instructions: hey, she got ME to finish something, lol.
Spectacular work, Gabi!
I like the "experts' opinion." =)
What stunning colours on black!
Post a Comment